INTRODUCTION
This guide will show you how to setup and configure a VPN connection on a device with Windows 7.
SYSTEM REQUIREMENTS
Windows 7 OS.
WHAT YOU MAY NEED & OTHER CONSIDERATIONS
• An internet connection
In the Network and Sharing Center (under Control Panel > Network and Internet), there is an option to “Set up a new connection or network.” The next option is to click on “Connect to a Workplace” in order to start the connection wizard, and then select “Use my Internet connection (VPN)” option to begin the process. If you have a 3G card installed, you may first see a prompt to use the 3G card instead of creating a “new” connection. In this case, you want the “new” connection so that you can use your existing internet connection (yes, it’s a little confusing).
A far easier way to get to this point is to click on the Start button and type “VPN” in the search box. It will jump straight to the “Set up a virtual private network (VPN) connection” window in the wizard.
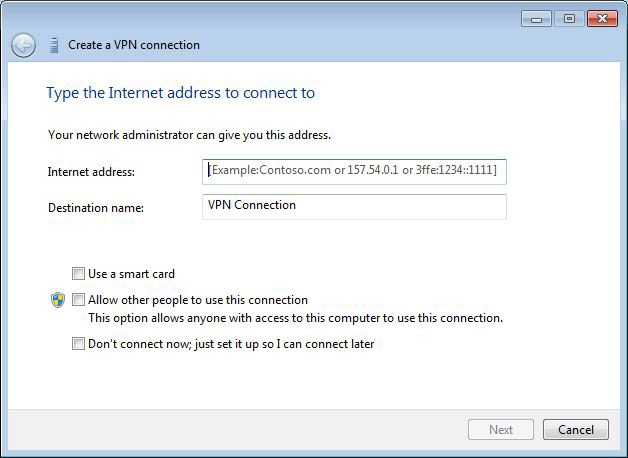
In the Internet address field, enter the IP address of the VPN server or the network’s domain name. This information will be provided by the network administrator or listed in any documentation given.
The destination name field displays the name of the connection for example “My Work”. If you aren’t going to connect right away, select the “Don’t connect now; just set it up so I can connect later” checkbox.
Leaving it unchecked means the client will try to make a connection at the end of the wizard. If there are multiple local users on the Windows 7 box, you can either check off “Allow other people to use this connection” to make the VPN connection available to others, or leave it unchecked to ensure no one else has the option.
This screen asks for a username and password. If you leave it blank, you will be prompted to enter the information when making the actual connection.
The final window, if you selected “Don’t connect now,” will display a “Connect now” option. You can close the window now or connect.
When you are ready to connect, just click on the network icon in systray (the icon could be for the wireless network or for the wired one) and the connection that was created earlier would show up in the list under “Dial-up and VPN“. You can also get here by clicking on “Connect to a network” under Network and Sharing Center.
In the VPN connection box, enter your network username and password to the network also including the domain.

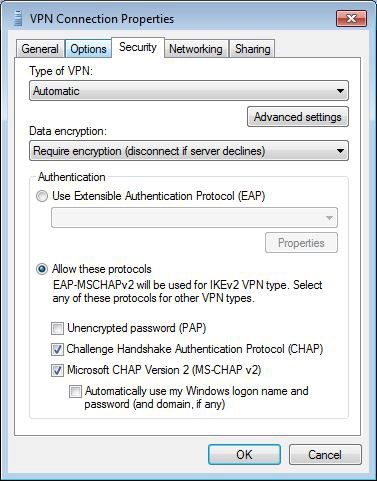
If the connection fails, click on Properties. The most common issue has to do with the server configuration. Select the “Security” tab in the Properties window. “Type of VPN” should be set to Automatic. Check with the administrator if it should be set to PPTP, L2TP/IpSec, SSTP, or IKEv2.
After saving the properties, select Connect to launch the connection. You are now connected to a VPN and are able to access network resources.